How to Stage a Real Estate Photography Shoot

Although most people appreciate the importance of curb appeal, they overlook a crucial element of their selling strategy—the pictures that appear in a property listing. Online postings determine how many people step foot on the property, and in some ways, it’s the most important part of marketing a house. Research shows professionally photographed properties sell faster and command a higher price. But to realize the full value of real estate photography, you need the right staging.
How Can Homeowners Prepare for a Real Estate Photography Shoot?
1. Clean Every Surface
Remove clutter and store as much as possible out of sight, including your outerwear and shoes. In the bathroom, put away your shampoo bottles and clear off the vanity. Then dust tall surfaces, like the ceiling fans; polish your wood trim, cabinetry, and furniture; clean the wall tiles and counters; and wipe down metal fixtures, mirrors, glass doors, and windows. Work your way down as you clean so you finish by vacuuming the carpets and mopping hard floors.
2. Stage the Dining Room Table
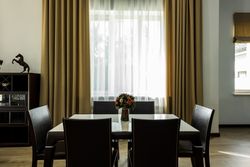 Space chairs at equal distances around the dining room table to create a sense of symmetry. If you have attractive, new-looking table settings, place them in front of the chairs like you would for formal entertaining. A simple bouquet, fruit bowl, or centerpiece will help draw the eye and add visual interest, but keep the arrangement small and understated—you don’t want to distract from the room.
3. Fluff the Pillows
Make all your beds and fluff the pillows. Pressing the linens will create clean, crisp lines that make a subtle but significant impact on the overall atmosphere. Arrange a few throw pillows on the couch and living room seating area to make the scene warm and inviting.
4. Layer Multi-Source Lighting
 By layering light fixtures in every room, you can introduce dimension and make the scene appear more expansive. You also want to use all incandescent or all compact fluorescent lightbulbs throughout every room so the light temperature is consistent throughout the photoshoot. Finally, open all your drapes and blinds to let in natural light.
5. Put Away Personal Items
Framed family portraits are beautiful to hang on the walls, but they’re not ideal for staging a house. You don’t want potential buyers to feel like they’re visiting your home—they should be able to picture themselves building a life there. Take down your pictures and hide personal knickknacks before the photography shoot and property showings.
6. Turn Off Distractions
Turn off electronics that move and could blur in a photo, like fans, TV screens, and computer monitors. Wait until the photographer arrives and then do a final walkthrough together to make sure you addressed everything.
When you’re ready to sell your property, it pays to work with a professional. K Thaemert Photography in St. Charles, MO, will help you attract prospective buyers and win the highest bid. To view the studio’s portfolio, visit the website. To learn more about real estate photography and its impact, call (636) 947-5956 today.
About the Business

